2 Using Griff-it
This chapter gives a comprehensive tour of the functionality available within Griff-it.
Note
Pressing the F1 key within Griff-it at any time will open this user guide at the relevant section.
2.1 The main window
Start Griff-it from the shortcut on your desktop, or from the Start menu. When Griff-it loads, you will be presented with the main window.
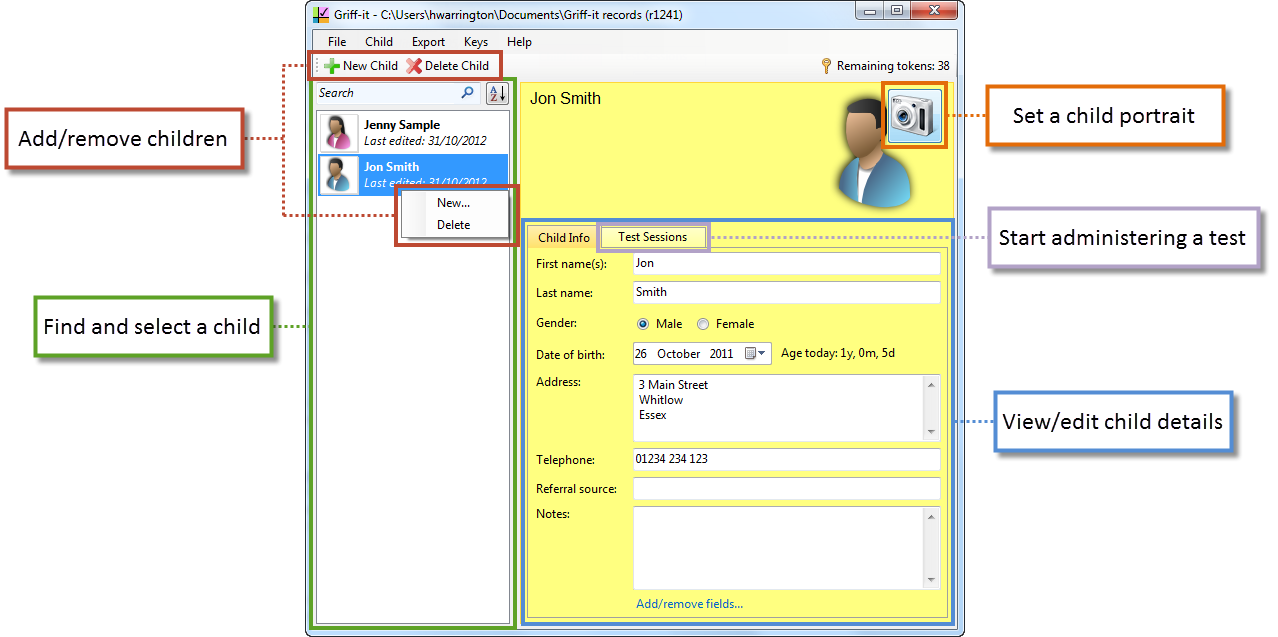
2.1.1 Record directories
The first time you run Griff-it, a record directory is automatically created for you in your documents folder. A record directory is a folder where Griff-it stores child records and recorded test scores.
Note that any generated reports are not stored in the record directory. It is up to you to store and organise report documents.
You should ensure that the contents of your record directory are backed up. If you work within an institution, contact your IT department for help with this. To make a backup, it is sufficient simply to copy the whole record directory to a safe location.
If you want to store your records in another location, such as a removable disk or networked drive, you can create a new record directory from the File menu. You should create a new subfolder for your Griff-it records, since it may grow to contain a large number of files.
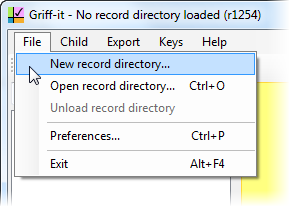
Griff-it automatically loads the last-used record directory on startup.
2.1.2 Creating and deleting child records
A child record is the place for storing all information about a single child, including any number of test sessions.
The two buttons near the top of the main window allow you to create a new child record, or delete the selected child.
Alternatively you may do the same by right-clicking in the list of children located on the left side of the main window.
Deleting a child removes all child personal information and any associated test sessions, and cannot be undone.
2.1.3 Browsing children
Click on a child in the list to view that child’s information and test sessions.
You may filter which children are displayed by typing all or part of a child’s name into the search box above the list on the left side.
Additionally you may alter the order in which children are listed by picking one of the options from the sort button above the child list.
2.1.4 Child information
Once you have selected a child from the list, his or her details are displayed in the yellow panel on the right side of the main window.
Any changes you make to a child are saved automatically. There is no ‘save’ button.
2.1.5 Setting a child portrait
You can store an image for each child to help you identify them. To do this, move the mouse pointer over the child’s portrait in the upper-right corner and click on the camera icon that appears.
2.1.6 Custom fields
You can customise which fields appear on the Child Info tab, for example to record additional information about children in a way that is convenient for your work.
To do this, click the ‘Add/remove fields...’ link at the bottom of the Child Info tab.
The names and types of fields, and the order in which they appear on the Child Info tab, is common to all children in the record directory. Adding a field adds it to all children while deleting a field will delete any values stored in that field for all children.
You may choose to include custom fields in any generated reports.
2.1.7 Test sessions
A test session is the name given to an individual administration of the Griffiths test within Griff-it. You can think of a test session as the digital equivalent of a copy of the test record booklet: a single set of recorded item outcomes and associated scores.
Each test session is associated with an individual child. To create a test session or modify an existing one, first select the desired child from the child list in the main window, then open the Test Sessions tab in the yellow panel on the right.
Note
Creating a test session consumes one token. See 4 Test administration tokens.
The outcomes recorded in a test session can be modified at any time, even if you have generated a report on a session.
Creating a new test session automatically opens that session in a new window called the ‘test editor’ (see below). Also you may double-click an existing test session in the list to open it in the test editor.
2.2 The test editor
The test editor corresponds to the inside pages of the printed record booklet. But Griff-it adds much functionality to the paper version.
You will see the familiar test items, organised into six columns, one for each subscale. The items from the four sections appear within a single scrollable area in six long columns, rather than on separate pages.
The test editor is highly interactive. Below we will examine its features in detail, concentrating on one small area.
2.2.1 Entering item outcomes with the mouse
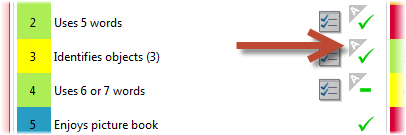
Initially each item is marked as unattempted, represented by an empty grey box. To change the outcome for an item, left-click on the item outcome indicator. Repeatedly clicking the outcome indicator switches between the available outcome states.
The possible item outcomes are:
- Pass, indicated by a green tick
- Fail, indicated by a green hyphen
- Unattempted, indicated by an empty grey box.
For items where the administration codes indicate that a reported outcome from a parent or carer is acceptable, the following additional item outcomes are available:
- Reported pass, indicated by ‘R’ followed by a tick
- Reported fail, indicated by ‘R’ followed by a hyphen.
2.2.2 Entering item outcomes with the keyboard
To enter an item outcome with the keyboard, a test item must first be selected. To select an item, left-click on the item text.
The currently selected item is indicated by a blue background and a dotted black border.
Once an item is selected, pressing the space bar takes that item through the available outcomes. This is equivalent to left-clicking on the item outcome indicator as above.
Use the four arrow keys to move between the test items. The Page up, Page down, Home and End keys all move item focus in the usual way.
2.2.3 Rapid outcome entry with the keyboard
To facilitate rapid entry of item outcomes, there is a set of keys which when pressed record an item outcome and then select the next item in the subscale. This can allow a paper record booklet to be quickly transcribed, for example.
The keyboard shortcuts are as follows. Note there are three alternative key clusters:
| Pass | Fail | Unattempted |
|---|---|---|
| P | F | U |
| A | S | D |
| J | K | L |
In addition to the table above, the hyphen (-) key marks an item as failed, and the question mark (?) and Delete keys both mark an item as unattempted.
Where items permit reported success or failure, hold shift plus one of the pass/fail keys above to record a reported success or failure. For example, Shift+F will enter a reported failure.
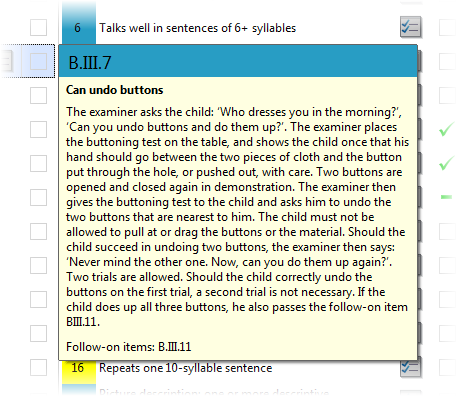
2.2.4 Item guidance tooltips
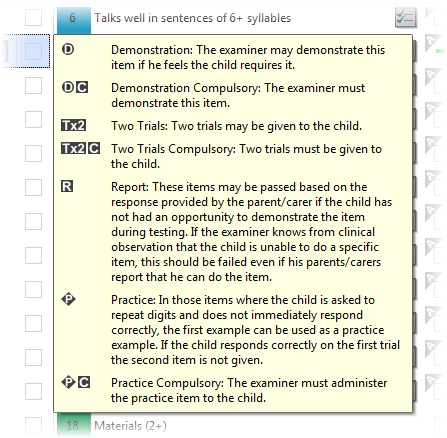
You can right-click the number or short description for any item to see the full item guidance from the administration manual.

The item guidance will appear in a tooltip which stays open until you move the mouse.
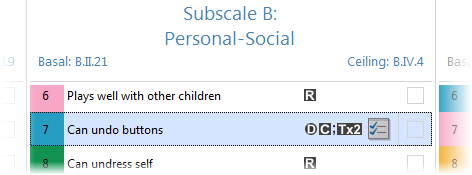
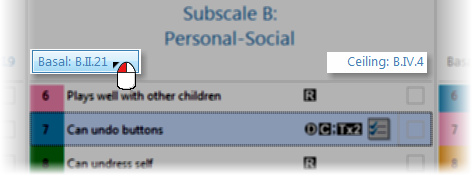
2.2.5 Basal and ceiling indicators
As soon as a basal or ceiling is recorded, the test editor will highlight the run of six passes or failures with a coloured rectangle. Additionally, the indicators at the top of each subscale will show the relevant item. Clicking one of the indicators will take you to the corresponding item in the test editor.
2.2.6 Administration codes
Griff-it displays the administration codes as described in the GMDS-ER Administration Key next to the relevant items. To remind yourself of the meanings of the codes, right-click the administration code area on any item.
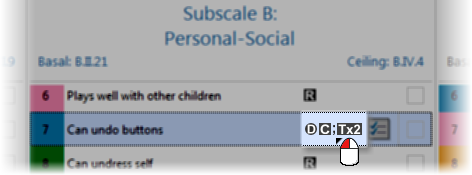
You will see the instructions repeated from the Administration Guide.
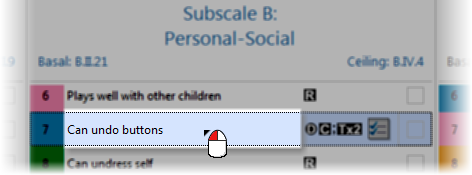
2.2.7 Popouts
Popouts are item-specific scoring grids that allow:
- recording of additional information relating to the test session beyond whether an item was passed/failed
- automatic entry of item outcomes (pass/fail) based on a child’s performance.
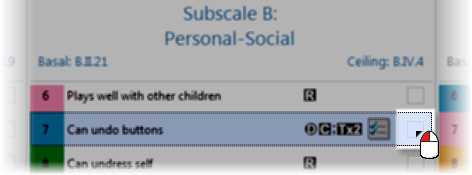
Wherever you see the following icon, left-click the button to open the associated popout:
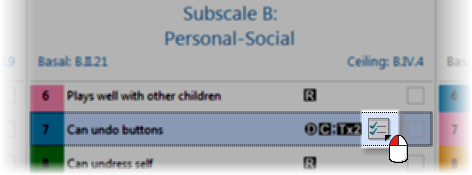
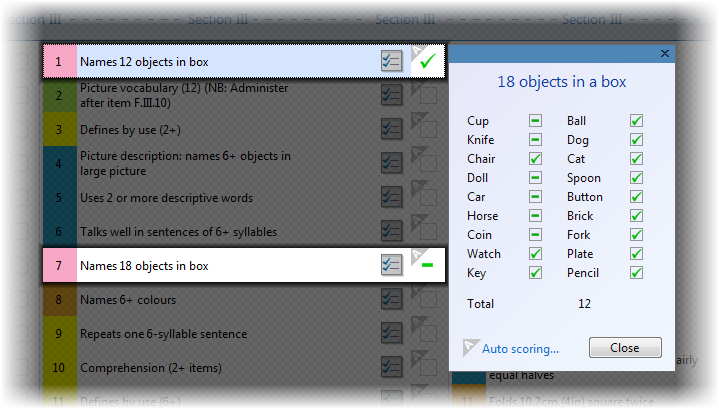
For example, each of the scoring grids from the printed record booklet (e.g. ‘18 objects in a box’ in C.III) corresponds to a Popout in the test editor.
There are additional popouts which have no equivalent in the printed booklet but which aim to make it easier to administer related series of items.
Every popout relates to two or more test items; clicking the popout button on any of the items in the same series opens the same popout. This allows outcomes for a related series of items to be entered rapidly.
As information is entered into a popout, outcomes for the associated items are filled in automatically. As an example, here is the popout for objects identified and named in subscale C:
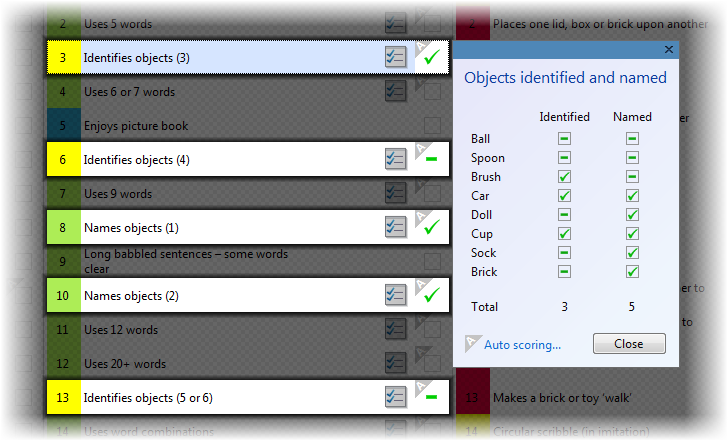
The child successfully named five objects and identified three. Therefore C.II.3, C.II.8 and C.II.10 have been marked as a pass, and C.II.6 and C.II.13 have been marked as a fail.
The contents of popouts may optionally be included in any generated reports.
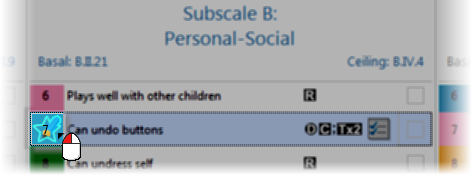
Any item whose score was set based on a popout is marked with an ‘A’ symbol in one corner:
Note
When the ‘A’ symbol is present, it is not possible to enter an item outcome directly by clicking the item outcome indicator. The only way to have an item marked as a pass or fail is by completing the popout. If you do not want to fill in popouts and prefer to enter item outcomes directly, see 2.2.8 Manual mode.
Popouts can be closed in any of these ways:
- Click anywhere outside the dark shaded area that appears when a popout is open
- Click the cross in the top right of the popout
- Click the Close button in the bottom right of the popout
- Click the button you clicked to show the popout in the first place
- Press the Escape key
- Open any other popout
2.2.7.1 Tick boxes
Some popouts have tick boxes which may take one of three states, corresponding to a task that has been passed, failed or simply not yet attempted.
This is analogous to items in the test editor. The tick boxes start in the unattempted state. Clicking on the tick box moves it through the three states.
Let’s take ‘18 objects in a box’ as an example:
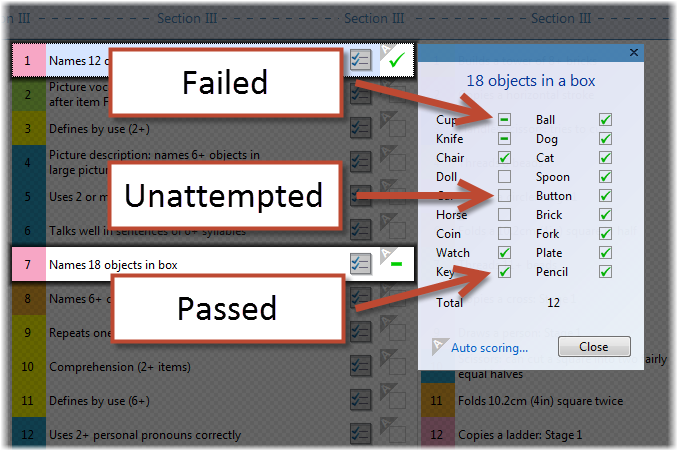
In the popout above, 12 of the 18 objects have been successfully named as denoted by a ticked box, so C.III.1 has been automatically marked as a pass. The child could not identify the cup or knife, meaning C.III.7 cannot be passed and has been automatically marked as a fail. For the remaining four objects, the examiner has not recorded anything, as denoted by empty or ‘unattempted’ tick boxes. In this child’s case any outcome provided for the remaining four objects will have no impact on the item outcomes in C.III.1 and C.III.7, but the examiner is free to record the details anyway.
To look at it another way, a ticked box in the paper record booklet corresponds to a ticked box in the popout. An empty box in the paper booklet corresponds to either a failed or unattempted box in the popout; the separate unattempted and failed states mean Griff-it additionally records whether or not the child has been given the opportunity to attempt the task.
2.2.7.2 Text boxes
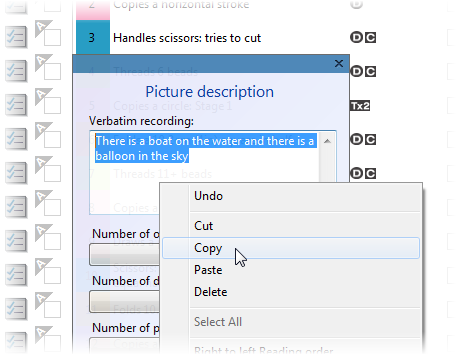
Text boxes appear in popouts where verbatim recording of what the child says may be useful or necessary. Often there is space for a verbatim response next to an accompanying tick box. Using the tick box you should record whether you think the child passed or failed the sub-task based on their response. From the perspective of calculating test scores, Griff-it considers only the mark in the tick box; it does not try to infer how the child performed from the contents of the text box. As with everything recorded in popouts, both the state of the tick box and any recorded text may be included in generated reports.
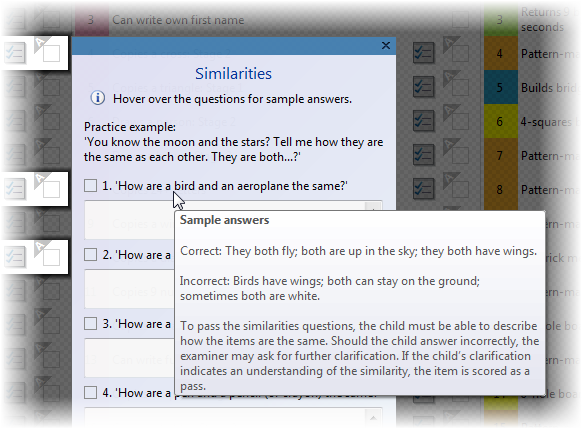
As an example here is the Similarities popout from C.IV:
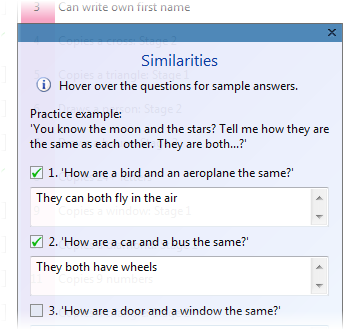
For the question-and-answer items such as Similarities, you can see sample answers by positioning the mouse pointer over each of the questions and ‘hovering’ until a tooltip appears:
Note that you can right-click any text box in Griff-it to obtain a list of actions such as copy and paste. The usual Windows shortcuts also apply, such as Ctrl+Z to undo.
2.2.7.3 Timers
Some popouts correspond to timed items. Subscale E has items where one timed trial is allowed, and others where the child is scored based on the best of two attempts. Each of these series of items shares a similar popout.
Here is the popout for the 4-squares board items:
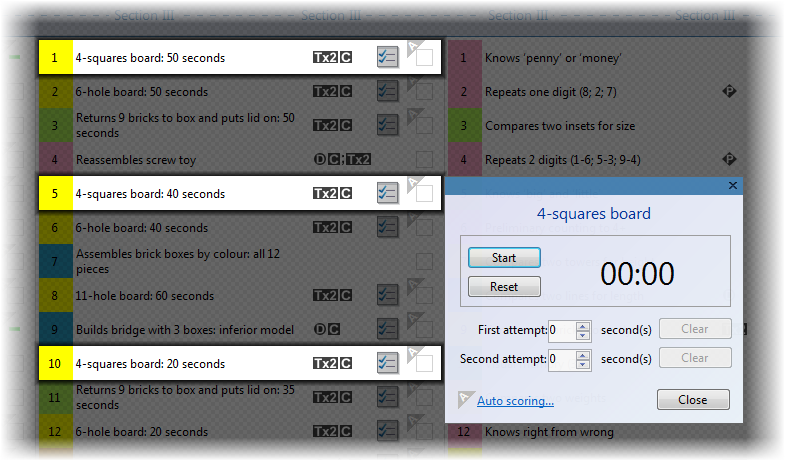
The top half of the popout consists of a stopwatch. Click the Start/Stop button to control the timer, and click Reset to set the clock back to zero.
The bottom half of the popout is where the child’s two attempts are recorded. A time of zero indicates that no attempt has been made yet; you may set the timer back to zero (or equivalently click the Clear button) to erase any recorded performance. Starting then stopping the timer records the time in the first attempt box if it is already zero, or in the second attempt box if it is set to zero. If two attempts have already been recorded, starting and stopping the timer does nothing.
The values in the attempt boxes may be changed at any time. As you set the attempts manually or via the stopwatch, the corresponding item outcomes are automatically entered in the background.
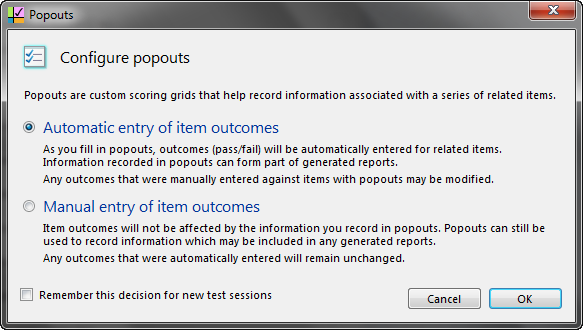
2.2.8 Manual mode
You can disable the automatic entry of item outcomes based on information recorded in Popouts. To do so, click the ‘Auto scoring...’ link at the bottom of any popout:
2.2.9 Taking notes
You can add a free-text note to any item in the test editor, or attach a note to the test session as a whole. This corresponds to the possibility of making notes anywhere on the paper record booklet.
To add a note to an item, move the mouse over the item number and left-click:
You can type whatever you like as an item note. Item notes may optionally be included in any generated reports.
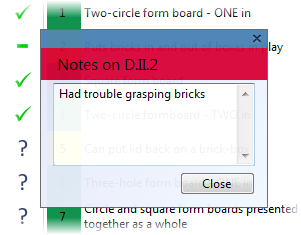
Any items that have an associated note are indicated with the following star icon. Click the item number again to edit or delete a note. You can also press the N key to open the note-taking dialogue.
You can also associate a note of any length with the test session as a whole. To do this, click the note icon at the top of the test editor.
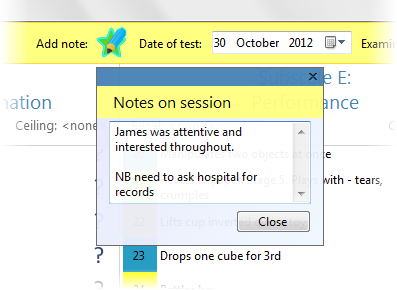
Any session note may also be included in generated reports.
2.2.10 Jump to an item
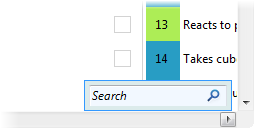
When the test editor is open, type Ctrl+F to open the search box. Type an item ID then press enter to jump to that item.
Here are some examples of permissible item IDs:
- A.III.7
- a.iii.7
- a-iii-7
- aiii7
Additionally, when an item is already selected in the test editor, you can press one of the number keys 1-4 to jump to the first item in the corresponding section I-IV.
2.2.11 Scrolling the test editor
The test editor is too large to completely fit on normal desktop monitors. The visible area may be scrolled in the usual way, using the scrollbars.
You can scroll vertically using a mouse wheel if you have one. You can scroll horizontally by holding down the Ctrl key while you turn the mouse wheel.
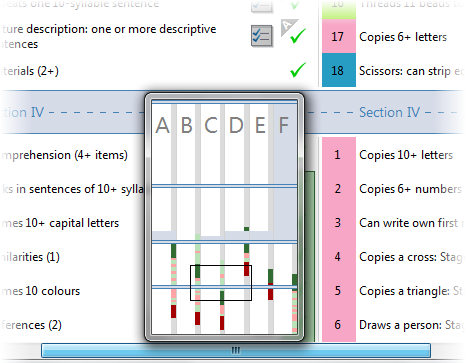
While scrolling using the scrollbars, a miniature representation of the test editor appears. This shows the visible area of the test editor within the whole. Any entered item outcomes are also shown with red for failed items and green for passed items. Any basals and ceilings are highlighted too.
2.3 Quick Summary
Quick summary provides an instant set of computed scores for any test session. It is similar to the Summary of test results in the printed record booklet.
To view a quick summary, select a test session in the Test Sessions tab and click the Quick Summary button.
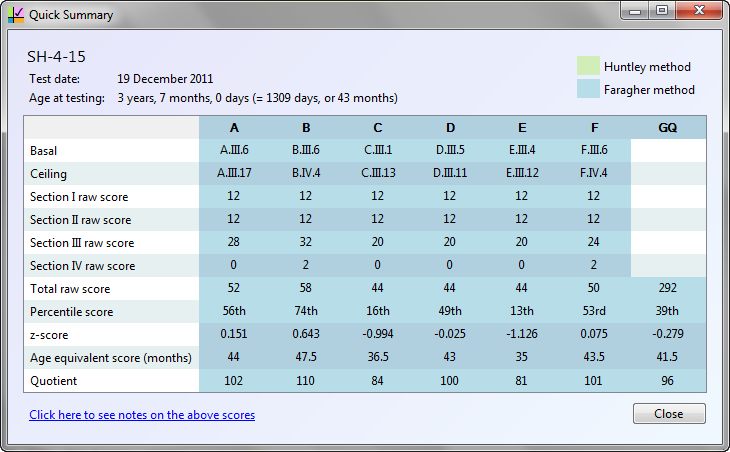
Quick summary may be displayed for test sessions that are only partially complete: asterisks (*) indicate that insufficient information was available to compute a result. Click the blue link at the bottom to read any scoring footnotes that may apply. See 3.3 Scoring footnotes for details.
2.4 Making reports
Griff-it can generate fully customisable and editable report documents for individual test sessions.
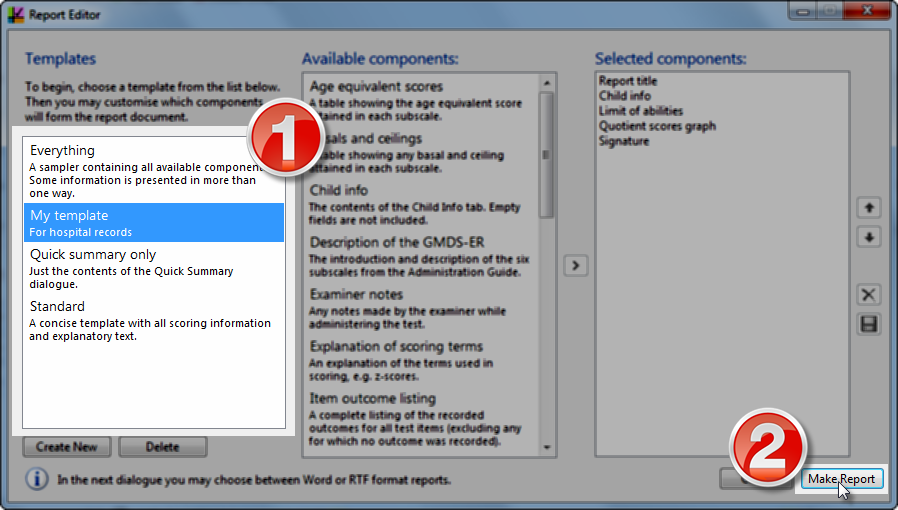
To begin, in the main window (1) select a test session from the Test Sessions tab and (2) click Make Report.

This will open the report editor.
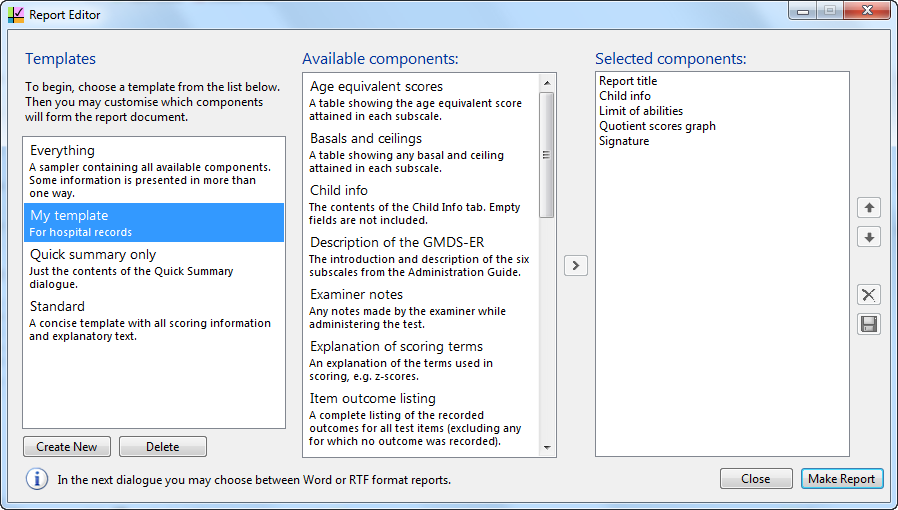
In the report editor, you may choose which components will be included in the report, and in what order those components appear. To generate a report quickly, simply (1) select a template from the list on the left side and (2) click Make Report.
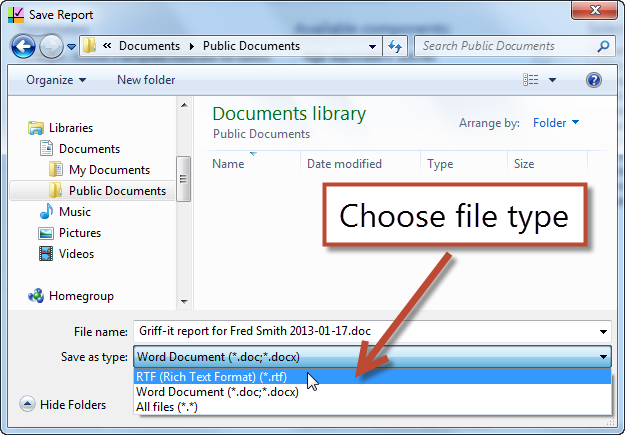
You will be asked where you would like to save your report document. After you click Save, report generation will begin. This should take a few seconds, after which the completed report will be opened.
Warning
Do not try to use Microsoft Word, even to edit another document, while report generation is in progress. Doing so may interfere with the generated report or any other open Word documents. Also do not attempt to copy and paste in any application during report generation.
2.4.1 Customising reports with templates
Templates allow you to save a combination of report components to be reused later. There are several built-in templates and you can create your own.
You can use any template as a starting point for your own. To select a template, click the template in the list on the left. To start with an empty template, click the Create New button.
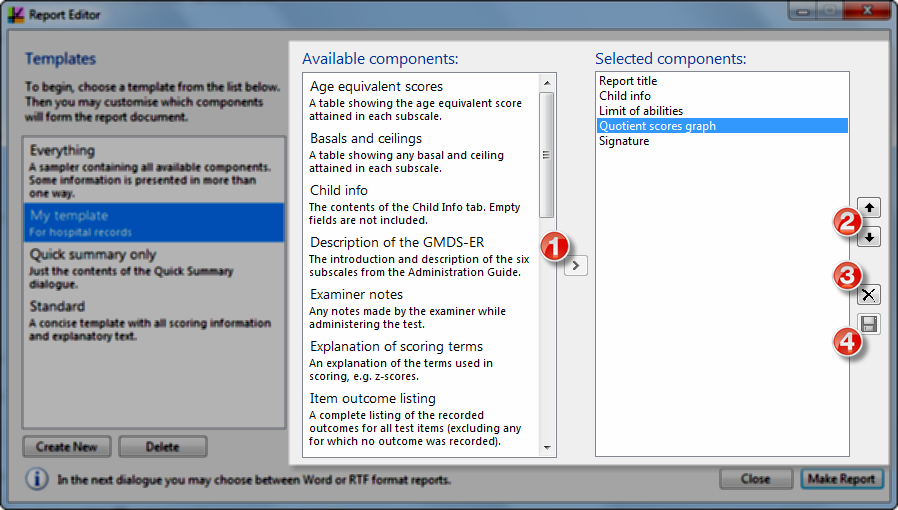
- To add a component to the report, click the component in the Available components list then click the arrow pointing to the right (1). Alternatively, double-click the component in the list.
- To change the position of a component within the report, click the component in the Selected components list then click the up/down arrows (2).
- To remove a component from a report, click the component in the Selected components list then click the delete component button (3).
- To save a new or modified template, click the save button (4). You do not have to save a template in order to use it, but if you wish to reuse the same report format in future it will save time.
To delete a template you have created, select it in the template list then click the Delete button beneath.
2.4.2 Rich Text Format (RTF) reports
To generate reports in Microsoft Word format, you will need an appropriate version of Word installed. See 1.3 Requirements. Rich Text Format (RTF) is an alternative format that may be opened in many common text editors. You may generate RTF reports whether or not Word is installed.
To change the report format, choose one of the options in the Save Report dialog that appears after clicking Make Report:
Note
Microsoft Word can also open RTF files. If you are using Word 2003, you may find that generating RTF reports produces more reader-friendly results than creating reports in Word’s .doc format.
2.5 Bulk data export
Griff-it allows saving child information and test scores for some or all of the children in your record directory into a single file. This is intended to help with large-scale studies and where other software packages need access to your Griff-it data.
To begin export, from main window click Export -> Export Child Data...:
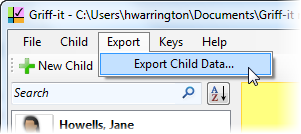
From the Export Child Data dialogue you can choose which children and what information to export. Once you have clicked the Export... button you can select a save location, and whether to save the data in Microsoft Excel or CSV (Comma-Separated Values) file format. Note that to export in Excel format you must first install and activate Microsoft Excel (see 1.3 Requirements).
Note
Microsoft Excel 2003 is limited to 256 columns in any given worksheet. The limit in Excel 2007 and later is 16,384 columns. Each test session takes up one column. If you need to export more test sessions than this limit, divide the task into several batches, e.g. children whose names begin with A-D, then E-H etc.
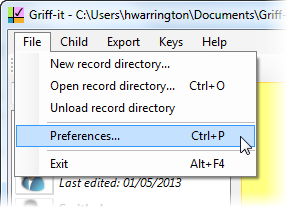
2.6 Preferences
Certain aspects of the way Griff-it works can be adjusted from the preferences dialogue:
![]()
Table Of Contents
- 2 Using Griff-it
- 2.1 The main window
- 2.2 The test editor
- 2.2.1 Entering item outcomes with the mouse
- 2.2.2 Entering item outcomes with the keyboard
- 2.2.3 Rapid outcome entry with the keyboard
- 2.2.4 Item guidance tooltips
- 2.2.5 Basal and ceiling indicators
- 2.2.6 Administration codes
- 2.2.7 Popouts
- 2.2.8 Manual mode
- 2.2.9 Taking notes
- 2.2.10 Jump to an item
- 2.2.11 Scrolling the test editor
- 2.3 Quick Summary
- 2.4 Making reports
- 2.5 Bulk data export
- 2.6 Preferences